Decorative CSS Gallery – Part 2
Posted on January 27, 2013 at 11:57 am
Long ago I wrote a tutorial on how to make decorative image galleries using an extra <span> tag. It requires jQuery to append the span tag which isn’t quite user friendly. Today I’m going to share a better method without using Javascript. The same result can be achieved by using :before or :after pseudo element. The :before element is one of the commonly under used elements, but it is quite useful for adding additional elements or content. Learn it now and start using it.
View DemoDecorative Gallery
HTML
Below is a sample image gallery markup in a <ul> list.
<ul class="gallery clip"> <li> <img src="http://webdesignerwall.com/wp-content/uploads/2012/09/sample-1.jpg" alt="image"> </li> <li> <img src="http://webdesignerwall.com/wp-content/uploads/2012/09/sample-2.jpg" alt="image"> </li> <li> <img src="http://webdesignerwall.com/wp-content/uploads/2012/09/sample-1.jpg" alt="image"> </li> </ul>
CSS
Below is the base style for the .gallery. The key property you have to add is relative position on the .gallery a element.
.gallery {
margin: 0 0 25px;
text-align: center;
}
.gallery li {
display: inline-block;
margin: 5px;
list-style: none;
}
.gallery a {
position: relative;
display: inline-block;
}
:before element
Now I’m going to specify a 30 x 60px container with the paper clip background image to the a:before element. Note that I leave the content property empty in the CSS rule. Without the empty content property, the container will not appear.

.clip a:before {
position: absolute;
content: ' ';
top: -5px;
left: -4px;
width: 30px;
height: 60px;
background: url(http://webdesignerwall.com/wp-content/uploads/2012/09/paper-clip.png) no-repeat;
}
Art Frame
You can use this trick to add any overlay graphic element on top. In this example, I just replaced the background image to an art frame graphic and adjusted the dimension and position.

.frame a:before {
position: absolute;
content: ' ';
top: -22px;
left: -23px;
width: 216px;
height: 166px;
background: url(http://webdesignerwall.com/wp-content/uploads/2012/09/frame.png) no-repeat;
}
HTML5 Gallery
Let’s create a more advanced gallery using HTML5 markups. In the example below, I have a <figure> tag wrapped around the image and a <figcaption> for image caption.

<ul class="gallery tape"> <li> <figure> <img src="http://webdesignerwall.com/wp-content/uploads/2012/09/sample-4.jpg" alt="image"> <figcaption>Image Caption</figcaption> </figure> </li> <li> <figure> <img src="http://webdesignerwall.com/wp-content/uploads/2012/09/sample-5.jpg" alt="image"> <figcaption>Image Caption</figcaption> </figure> </li> <li> <figure> <img src="http://webdesignerwall.com/wp-content/uploads/2012/09/sample-6.jpg" alt="image"> <figcaption>Image Caption</figcaption> </figure> </li> </ul>
CSS
In the CSS, I added two :before elements: one on the <figure> element and another one on the <li> element. The overlay.png (mask image) is applied to the figure:before element and the tape graphic is applied on the a:before element.

.tape li {
width: 170px;
padding: 5px;
margin: 15px 10px;
border: solid 1px #cac09f;
background: #fdf8e4;
text-align: center;
box-shadow: inset 0 1px rgba(255,255,255,.8), 0 1px 2px rgba(0,0,0,.2);
}
.tape figure {
position: relative;
margin: 0;
}
.tape a:before {
position: absolute;
content: ' ';
top: 0;
left: 0;
width: 100%;
height: 100%;
background: url(http://webdesignerwall.com/wp-content/uploads/2012/09/overlay.png) no-repeat;
}
.tape figcaption {
font: 100%/120% Handlee, Arial, Helvetica, sans-serif;
color: #787568;
}
.tape a:before {
position: absolute;
z-index: 2;
content: ' ';
top: -12px;
left: 50%;
width: 115px;
height: 32px;
margin-left: -57px;
background: url(http://webdesignerwall.com/wp-content/uploads/2012/09/tape.png) no-repeat;
}
CSS3 Transform
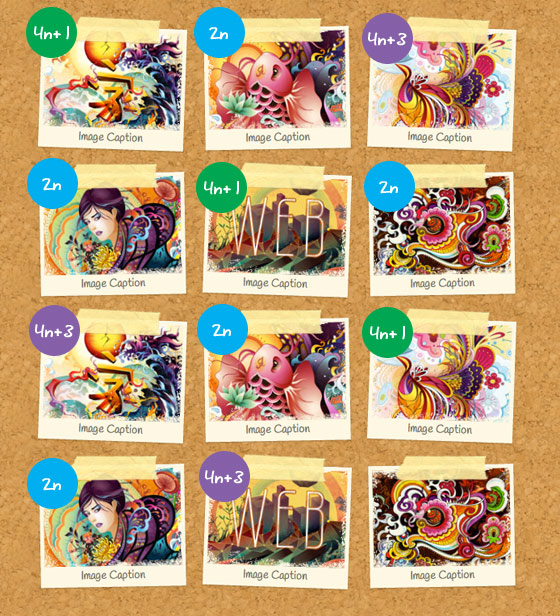
In this gallery, I added a cork pattern background on the gallery and use transform property to rotate the images.
.transform {
background: url(http://webdesignerwall.com/wp-content/uploads/2012/09/cork-bg.png);
padding: 25px;
border-radius: 10px;
box-shadow: inset 0 1px 5px rgba(0,0,0,.4);
}
.transform li {
border: none;
}
Nth-of-Type
To make the image rotation look randomized and more natural, I applied a different rotation angle using nth-of-type.

.transform li:nth-of-type(4n+1) {
-webkit-transform: rotate(2deg);
}
.transform li:nth-of-type(2n) {
-webkit-transform: rotate(-1deg);
}
.transform li:nth-of-type(4n+3) {
-webkit-transform: rotate(2deg);
}
Update:
I’ve updated the gallery demo and CSS so now the images are linked. Now the :before element is added to the tag.
Posted in Web Design